事件驱动和订阅发布模式

1 事件驱动/订阅发布模式

参考文献:https://blog.csdn.net/weixin_46058921/article/details/126978976

简介

事件驱动一个常见的形式就是 发布-订阅 模式,在跨进程的通信间,我们常常使用 消息队列 来实现消息的发布订阅。目前主流的框架中,均采用消息的 发布-订阅 模式来进行大型分布式项目的解耦。使得数据生产方和发送方分离,同时 MQ 还能起到削峰的作用。同一进程内很多时候也需要这种事件驱动机制来进行解耦

原理

事件机制主要由三个部分组成:事件源、事件对象、监听器

  • 事件源(订阅发布模式中的发布者):事件发生的起源
  • 事件对象(观察者模式中的主题):事件实体,事件对象会持有一个事件源
  • 监听器(观察者模式中的观察者、订阅发布模式中的订阅者):监听事件对象,对事件对象进行处理
  • 事件分发器(复杂事件模型中负责将将事件源发出的时间触发订阅者的行为,决定了是同步行为还是异步行为)

2 Java事件驱动

Java 提供了关于事件相关的两个接口:

  • EventObject:事件对象,自定义事件需要继承该类
  • EventListener:事件监听器接口

由于事件源 Source 不需要实现任何接口,所以 Java 中没有给出相应的定义

一个利用 Java 原生实现事件的例子:

  • 事件。观察者模式中的主题。
1
2
3
4
5
6
7
8
9
10
11
12
13
14
15
16
17
18
19
20
21
22
23
24
25
26
27
import java.util.EventObject;

/**
* @Author: chenyang
* @DateTime: 2022/9/21 10:08
* @Description: 事件对象
*/
public class JavaEvent extends EventObject {

private String msg;


/**
* Constructs a prototypical Event.
*
* @param source The object on which the Event initially occurred.
* @throws IllegalArgumentException if source is null.
*/
public JavaEvent(Object source, String msg) {
super(source);
this.msg = msg;
}

public String getMsg() {
return msg;
}
}
  • 事件监听器。观察者模式中的观察者、订阅发布模式中的订阅者
1
2
3
4
5
6
7
8
9
10
11
12
13
14
import com.yang.common.event.JavaEvent;
import java.util.EventListener;

/**
* @Author: chenyang
* @DateTime: 2022/9/21 10:09
* @Description: 事件监听者,按照 Java 规范应实现 EventListener 接口
*/
public class JavaListener implements EventListener {

public void handlerEvent(JavaEvent event){
System.out.println("Java Event msg : " + event.getMsg());
}
}
  • 事件源发布事件
1
2
3
4
5
6
7
8
9
10
11
12
13
14
15
16
17
18
19
20
21
22
23
24
import com.yang.common.event.JavaEvent;
import com.yang.common.listener.JavaListener;
import java.util.EventListener;
import java.util.HashSet;

/**
* @Author: chenyang
* @DateTime: 2022/9/21 10:12
* @Description: 事件源
*/
public class JavaSource {
private static HashSet<EventListener> set = new HashSet<>();

public void addListener(EventListener listener){
set.add(listener);
}

public void publishEvent(JavaEvent event){
for (EventListener listener : set) {
((JavaListener)listener).handlerEvent(event);

}
}
}
  • 组装并触发事件
1
2
3
4
5
6
7
8
public class Main {
public static void main(String[] args) {
JavaSource source = new JavaSource();
JavaListener listener = new JavaListener();
source.addListener(listener);
source.publishEvent(new JavaEvent(source, "SAY MY NAME !!!"));
}
}

3 Spring事件驱动

Spring 提供了事件相关的接口和类,在 Spring 中可以通过实现接口来实现事件的 发布-订阅。Spring 的事件机制是以 Java 的事件机制为基础按需进行了扩展。

Spring 中与事件相关的定义如下:

  • ApplicationEvent:继承 ObjectEvent 类,事件源应该继承该类。

  • ApplicationListener:事件监听者,该类接受一个泛型,供 ApplicationEventPublisher 在发布事件时选择 EventListener。

  • ApplicationEventPublisher:封装发布事件的方法,通知所有在 Spring 中注册的该事件的监听者进行处理。

  • ApplicationEventPublisherAware:Spring 提供的 Aware 接口之一,实现该接口的 Bean 可以获取 ApplicationEventPublisher 并进行发布事件。

通过继承ApplicationEventPublisherAware发布事件

  • 实现事件对象Event。观察者模式中的主题
1
2
3
4
5
6
7
8
9
10
11
12
13
14
15
16
17
18
19
20
21
22
23
24
import org.springframework.context.ApplicationEvent;

/**
* @Author: chenyang
* @DateTime: 2022/9/21 11:07
* @Description: 事件对象
*/
public class SpringEventAware extends ApplicationEvent {

private String msg;

public SpringEventAware(Object source, String msg) {
super(source);
this.msg = msg;
}

public SpringEventAware(Object source) {
super(source);
}

public String getMsg() {
return msg;
}
}
  • 创建监听器。观察者模式中的观察者,订阅发布模式中的订阅者。
1
2
3
4
5
6
7
8
9
10
11
12
13
14
15
16
import com.yang.common.event.SpringEvent;
import org.springframework.context.ApplicationListener;
import org.springframework.stereotype.Component;

/**
* @Author: chenyang
* @DateTime: 2022/9/21 11:08
* @Description: 事件监听者,事件监听者实现ApplicationListener<E extends ApplicationEvent>, 交由 Spring 进行管理,无需自己进行监听器的注册与通知过程
*/
@Component
public class SpringListenerAware implements ApplicationListener<SpringEventAware> {
@Override
public void onApplicationEvent(SpringEventAware event) {
System.out.println("publish event, msg is : " + event.getMsg());
}
}
  • 事件源。观察者模式中的发布者。
1
2
3
4
5
6
7
8
9
10
11
12
13
14
15
16
17
18
19
20
21
22
23
24
25
26
27
28
29
30
31
32
33
34
35
import com.yang.common.event.SpringEvent;
import org.springframework.context.ApplicationEventPublisher;
import org.springframework.context.ApplicationEventPublisherAware;
import org.springframework.stereotype.Component;

/**
* @Author: chenyang
* @DateTime: 2022/9/21 11:09
* @Description: 事件源
*/
@Component
public class SpringPublishAware implements ApplicationEventPublisherAware {

private ApplicationEventPublisher applicationEventPublisher;

public void publishEvent(String msg){
applicationEventPublisher.publishEvent(new SpringEventAware(this, msg));
}

@Override
public void setApplicationEventPublisher(ApplicationEventPublisher applicationEventPublisher) {
this.applicationEventPublisher = applicationEventPublisher;
}
}


@Autowired
private SpringPublishAware springPublishAware;

@Test
void contextLoads2() {
springPublishAware.publishEvent("通过 Spring 实现发布订阅");
}

通过注入ApplicationEventPublisher发布事件

  • 事件。观察者模式中的主题
1
2
3
4
5
6
7
8
9
10
11
12
13
14
15
16
17
18
19
@Data
public class Task {
private String name;
private String address;
}


public class SpringEvent extends ApplicationEvent {
private Task task;

public SpringEvent(Task task) {
super(task);
this.task = task;
}

public Task getTask() {
return task;
}
}
  • 事件监听器。观察者、订阅者。
1
2
3
4
5
6
7
8
9
10
@Component
public class SpringListener implements ApplicationListener<SpringEvent> {
@Override
public void onApplicationEvent(SpringEvent event) {
Task task = event.getTask();
System.err.println("事件接受任务");
System.err.println(task);
System.err.println("任务完成");
}
}
  • 事件源。通过注入对象发布事件。
1
2
3
4
5
6
7
8
9
10
11
12
13
@Autowired
private ApplicationEventPublisher publisher;

@Test
void contextLoads3() {
Task task = new Task();
task.setName("admin");
task.setAddress("unknown area");
SpringEvent event = new SpringEvent(task);
System.out.println("开始发布任务");
publisher.publishEvent(event);
System.out.println("发布任务完成");
}

以上代码中,可以看到。在 Spring 框架使用事件与在 Java 中使用时间机制其实并没有什么不同,均由 事件源、事件对象以及事件监听者组成。与 Java 原生提供的事件机制不同的是,Spring 中提供了 ApplicationEvent 类作为基类,开发者可以以此为基础定义自己的自定义事件。

在 Spring 中,继承自 ApplicationEvent 的事件对象的监听者,可以由 Spring 容器进行管理,并在发布时通过 ApplicationEventPublisher 进行发布。这就避免了我们自己实现监听者的注册和通知过程,免去了很多繁杂的过程,使得更专心于业务本身。

4 Spring事件分发框架原理

ApplicationEvent

  • ApplicationEvent 继承了 JDK 中的事件对象 EventObject,在 Spring 中所有事件对象均应继承自 ApplicationEvent。在Spring基础上,其增加了事件发生时的时间戳属性以及序列化ID,并提供了通过事件源进行构建的构造方法。 Spring 中的 ApplicationEvent 设置成抽象类,由于一个单独的 ApplicationEvent 是没有任何语义的,所以需要根据不同场景进行扩展,在其之上为事件赋予意义。此类的说明中,作者也很好的说明了这一点。
1
2
3
4
5
6
7
8
9
10
11
12
13
14
15
16
17
18
19
20
21
22
23
24
25
26
27
28
29
30
31
32
33
/**
* Class to be extended by all application events. Abstract as it
* doesn't make sense for generic events to be published directly.
*
* @author Rod Johnson
* @author Juergen Hoeller
*/
public abstract class ApplicationEvent extends EventObject {

/** use serialVersionUID from Spring 1.2 for interoperability */
private static final long serialVersionUID = 7099057708183571937L;

/** System time when the event happened */
private final long timestamp;


/**
* Create a new ApplicationEvent.
* @param source the object on which the event initially occurred (never {@code null})
*/
public ApplicationEvent(Object source) {
super(source);
this.timestamp = System.currentTimeMillis();
}


/**
* Return the system time in milliseconds when the event happened.
*/
public final long getTimestamp() {
return this.timestamp;
}
}

EventListener

  • JDK 中提供了 EventListener 接口,作为事件监听者标记。Spring 在 EventListener 接口的基础上,提供了 ApplicationListener 接口。该接口接收一个 ApplicationEvent 的子类,完成事件的监听流程。具体源代码如下ApplicationEvent 继承了 JDK 中的事件对象 EventObject,在 Spring 中所有事件对象均应继承自 ApplicationEvent。在Spring基础上,其增加了事件发生时的时间戳属性以及序列化ID,并提供了通过事件源进行构建的构造方法。 Spring 中的 ApplicationEvent 设置成抽象类,由于一个单独的 ApplicationEvent 是没有任何语义的,所以需要根据不同场景进行扩展,在其之上为事件赋予意义。此类的说明中,作者也很好的说明了这。该接口是一个函数型接口,提供了一个 onApplicationEvent(E extends Application) 方法定义,所有自行实现的监听者均需要实现该接口,并在该方法中进行事件的处理。
1
2
3
4
5
6
7
8
9
10
11
12
13
14
15
16
17
18
19
20
21
22
23
24
25
26

/**
* Interface to be implemented by application event listeners.
* Based on the standard {@code java.util.EventListener} interface
* for the Observer design pattern.
*
* <p>As of Spring 3.0, an ApplicationListener can generically declare the event type
* that it is interested in. When registered with a Spring ApplicationContext, events
* will be filtered accordingly, with the listener getting invoked for matching event
* objects only.
*
* @author Rod Johnson
* @author Juergen Hoeller
* @param <E> the specific ApplicationEvent subclass to listen to
* @see org.springframework.context.event.ApplicationEventMulticaster
*/
@FunctionalInterface
public interface ApplicationListener<E extends ApplicationEvent> extends EventListener {

/**
* Handle an application event.
* @param event the event to respond to
*/
void onApplicationEvent(E event);

}

ApplicationEventMulticast

ApplicationEventMulticaster是Spring中事件核心,通知中心,负责将指定的事件类型发布给订阅者。主要包括以下内容。提供一个发布事件的接口multicastEvent

  • 构建并维护事件类型和监听器关系。
  • 解析事件类型resolveDefaultEventType
  • 根据事件类型获取监听器列表getApplicationListeners。
  • 实现了事件执行器。事件执行器可以有多种:同步执行器、异步执行器、消息队列异步执行器
1
2
3
4
5
6
7
8
9
10
11
12
13
14
15
16
17
18
19
20
21
22
23
24
25
26
27
28
29
30
31
32
33
34
35
36
37
38
39
40
41
42
43
44
45
46
47
48
49
50
51
52
@Override
public void multicastEvent(final ApplicationEvent event, @Nullable ResolvableType eventType) {
ResolvableType type = (eventType != null ? eventType : resolveDefaultEventType(event));
Executor executor = getTaskExecutor();
for (ApplicationListener<?> listener : getApplicationListeners(event, type)) {
if (executor != null) {
executor.execute(() -> invokeListener(listener, event));
}
else {
invokeListener(listener, event);
}
}
}


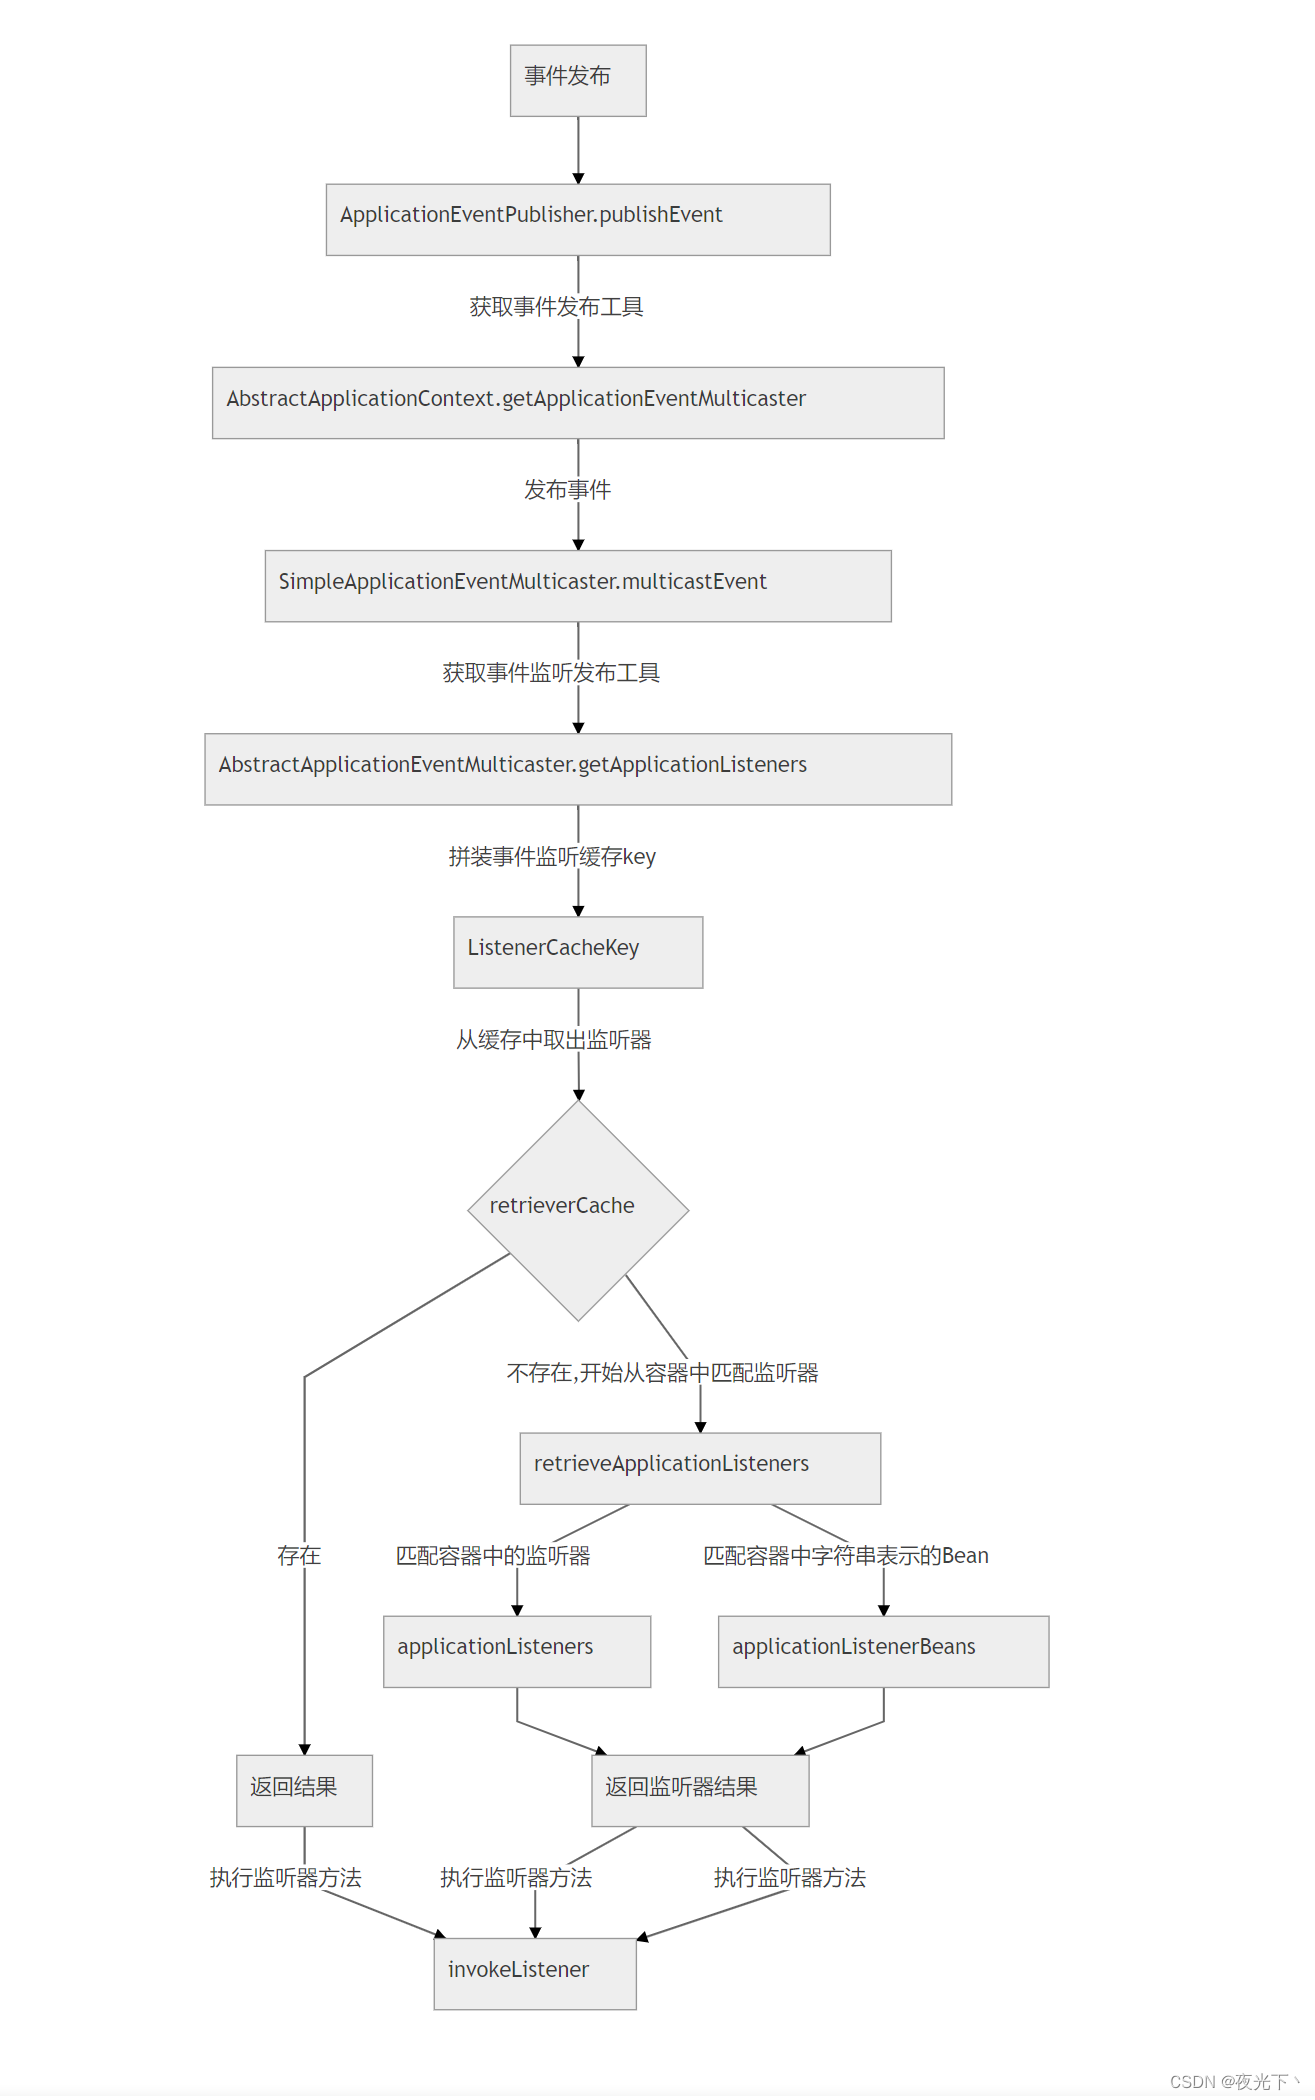
protected Collection<ApplicationListener<?>> getApplicationListeners(
ApplicationEvent event, ResolvableType eventType) {

Object source = event.getSource();
Class<?> sourceType = (source != null ? source.getClass() : null);
ListenerCacheKey cacheKey = new ListenerCacheKey(eventType, sourceType);

// Potential new retriever to populate
CachedListenerRetriever newRetriever = null;

// Quick check for existing entry on ConcurrentHashMap
CachedListenerRetriever existingRetriever = this.retrieverCache.get(cacheKey);
if (existingRetriever == null) {
// Caching a new ListenerRetriever if possible
if (this.beanClassLoader == null ||
(ClassUtils.isCacheSafe(event.getClass(), this.beanClassLoader) &&
(sourceType == null || ClassUtils.isCacheSafe(sourceType, this.beanClassLoader)))) {
newRetriever = new CachedListenerRetriever();
existingRetriever = this.retrieverCache.putIfAbsent(cacheKey, newRetriever);
if (existingRetriever != null) {
newRetriever = null; // no need to populate it in retrieveApplicationListeners
}
}
}

if (existingRetriever != null) {
Collection<ApplicationListener<?>> result = existingRetriever.getApplicationListeners();
if (result != null) {
return result;
}
// If result is null, the existing retriever is not fully populated yet by another thread.
// Proceed like caching wasn't possible for this current local attempt.
}

return retrieveApplicationListeners(eventType, sourceType, newRetriever);
}

大致流程: 通过时间类型和事件中的数据源类型,构建一个缓存key,先去缓存中获取有无此key对应的事件处理器。 如果不存在则构建一个新的 ListenerRetriever,然后调用 retrieveApplicationListeners方法获得监听的listener

此处以 SimpleApplicationEventMulticaster 中的方法定义为例,作为默认注入的类型,通常我们在默认情况下的事件发布流程均遵循该实现。 从程序中可以看出,multicastEvent的主要逻辑可以分为三部分:

  • 获取事件类型,主要用来获得Spring Event的实际类型。resolveDefaultEventType(event))

  • getApplicationListeners(event, type)根据事件和事件类型去获得此事件和事件类型的监听器

  • 遍历监听者集合,通过 multicaster 内持有的 Executor 进行通知,此处最后调用了 ApplicationListener 中的 onApplicationEvent 方法,这一方法正是我们在自定义 ApplicationListener 时必须要覆写的方法。

自动注册事件监听关系

  • Spring 中,不需要我们手动进行监听器注册。ApplicationListener 对象一旦在 Spring 容器中被注册,Spring 会进行监听器的注册,实现事件的监听。在介绍监听者注册流程之前,

  • 首先需要介绍介绍一下org.springframework.context.event.ApplicationEventMulticaster,其主要定义了管理事件监听者,与发布事件到监听者的相关操作,若没有定义,Spring 容器将默认实例化 SimpleApplicationEventMulticaster 。

  • 在 Spring 中,初始化容器时会调用 org.springframework.context.ConfigurableApplicationContext 接口中的 reFresh() 方法进行 Bean的加载,该方法会进行事件的监听注册。具体代码如下:

    • 调用 initApplicationEventMulticaster() 方法初始化一个 ApplicationEventMulticaster,默认情况下初始化为 SimpleApplicationEventMulticaster。
    • 调用 registerListeners() 方法进行事件监听者的注册。
1
2
3
4
5
6
7
8
9
10
11
12
13
14
15
16
17
18
19
20
21
22
23
24
25
26
27
28
29
30
31
32
33
34
35
36
37
38
39
40
41
42
43
44
45
46
47
48
49
50
51
52
53
54
55
56
57
58
59
60
61
62
63
64
65
66
67
68
69
70
71
72
73
74
75
76
77
78
79
80
81
82
83
84
85
86
87
88
89
90
91
92
93
94
95
96
97
98
99
100
101
102
103
104
105
106
107
108
109
110
@Override
public void refresh() throws BeansException, IllegalStateException {
synchronized (this.startupShutdownMonitor) {
StartupStep contextRefresh = this.applicationStartup.start("spring.context.refresh");

// Prepare this context for refreshing.
prepareRefresh();

// Tell the subclass to refresh the internal bean factory.
ConfigurableListableBeanFactory beanFactory = obtainFreshBeanFactory();

// Prepare the bean factory for use in this context.
prepareBeanFactory(beanFactory);

try {
// Allows post-processing of the bean factory in context subclasses.
postProcessBeanFactory(beanFactory);

StartupStep beanPostProcess = this.applicationStartup.start("spring.context.beans.post-process");
// Invoke factory processors registered as beans in the context.
invokeBeanFactoryPostProcessors(beanFactory);

// Register bean processors that intercept bean creation.
registerBeanPostProcessors(beanFactory);
beanPostProcess.end();

// Initialize message source for this context.
initMessageSource();

// Initialize event multicaster for this context.
initApplicationEventMulticaster();

// Initialize other special beans in specific context subclasses.
onRefresh();

// Check for listener beans and register them.
registerListeners();

// Instantiate all remaining (non-lazy-init) singletons.
finishBeanFactoryInitialization(beanFactory);

// Last step: publish corresponding event.
finishRefresh();
}

catch (BeansException ex) {
if (logger.isWarnEnabled()) {
logger.warn("Exception encountered during context initialization - " +
"cancelling refresh attempt: " + ex);
}

// Destroy already created singletons to avoid dangling resources.
destroyBeans();

// Reset 'active' flag.
cancelRefresh(ex);

// Propagate exception to caller.
throw ex;
}

finally {
// Reset common introspection caches in Spring's core, since we
// might not ever need metadata for singleton beans anymore...
resetCommonCaches();
contextRefresh.end();
}
}
}
protected void initApplicationEventMulticaster() {
ConfigurableListableBeanFactory beanFactory = getBeanFactory();
if (beanFactory.containsLocalBean(APPLICATION_EVENT_MULTICASTER_BEAN_NAME)) {
this.applicationEventMulticaster =
beanFactory.getBean(APPLICATION_EVENT_MULTICASTER_BEAN_NAME, ApplicationEventMulticaster.class);
if (logger.isTraceEnabled()) {
logger.trace("Using ApplicationEventMulticaster [" + this.applicationEventMulticaster + "]");
}
}
else {
this.applicationEventMulticaster = new SimpleApplicationEventMulticaster(beanFactory);
beanFactory.registerSingleton(APPLICATION_EVENT_MULTICASTER_BEAN_NAME, this.applicationEventMulticaster);
if (logger.isTraceEnabled()) {
logger.trace("No '" + APPLICATION_EVENT_MULTICASTER_BEAN_NAME + "' bean, using " +
"[" + this.applicationEventMulticaster.getClass().getSimpleName() + "]");
}
}
}

protected void registerListeners() {
// Register statically specified listeners first.
for (ApplicationListener<?> listener : getApplicationListeners()) {
getApplicationEventMulticaster().addApplicationListener(listener);
}

// Do not initialize FactoryBeans here: We need to leave all regular beans
// uninitialized to let post-processors apply to them!
String[] listenerBeanNames = getBeanNamesForType(ApplicationListener.class, true, false);
for (String listenerBeanName : listenerBeanNames) {
getApplicationEventMulticaster().addApplicationListenerBean(listenerBeanName);
}

// Publish early application events now that we finally have a multicaster...
Set<ApplicationEvent> earlyEventsToProcess = this.earlyApplicationEvents;
this.earlyApplicationEvents = null;
if (!CollectionUtils.isEmpty(earlyEventsToProcess)) {
for (ApplicationEvent earlyEvent : earlyEventsToProcess) {
getApplicationEventMulticaster().multicastEvent(earlyEvent);
}
}
}

由上文代码可见,注册监听者的过程主要可以分为以下三部分:

  • 添加容器中指定的监听器,通常这部分添加的监听器由 Spring 控制;
  • 从 BeanFactory 中获取全部实现了 ApplicationListener 接口的 BeanNames,并把其推送给 ApplicationEventMulticaster
  • 若有需要立即执行的事件,直接执行这些事件的发布

事件发布的流程如下